Tuesday, July 17, 2012

Weekends Were Made For...Photography


Back in the day, there was a song with a line that went "Weekends were made for Michelob."  That's all well and good, but I'll change that to say that 'weekends were made for photography.'   


You see, I have a full-time job which I rather enjoy.  So I won't be quitting it to do photography full time anytime soon.  So that leaves photography fun for the evenings and weekends.  During the week after work, I usually watch photography videos or read blogs.  My work days are long, so I don't shoot during the week, but the weekends are another story.


Every weekend, I do something photography related.  I do photo shoots, practice lighting setups and techniques, assist other photographers, or go on my own personal photo excursions.  Since I'm not a full-time photographer, I try to make sure that I do something to keep my skills sharp or learn something new.    


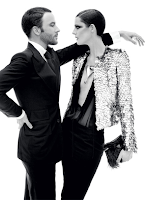
For example, a few weeks ago, I decided to re-test my ability to figure out lighting setups.  So I looked at some images that I had saved on my phone.  I ran across one that I loved, but a year ago, I couldn't figure out how it was lit.  


Image of Fashion Designer Tom Ford and model for Vogue magazine.
I couldn't figure out how Mr. Ford had white highlights on the back of his jacket, on the back of his leg, and under his hand.  I asked some photographer friends if they knew how it was lit, but I was never clear on how it was done.  This year after much lighting practice with Mandy, I finally figured it out.  The background looks overexposed with the light starting to wrap around his back and legs.  Nice.  It makes sense now, but last year I couldn't figure it out so save my life.


So what do you do with your weekends if you're not a full-time photographer?    I would love to know.


Tuesday, June 19, 2012

Practice Makes Perfect?

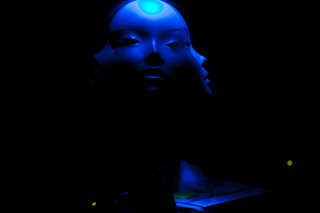
Hello, all.  I'd like for you to meet Mandy.  She's a mannequin head that I use for a lot of practice shoots when I can't get a live model.  I use her when I want to see what a certain lighting setup or shot will look like.  


Meet Mandy
We've all heard the phrase that practice makes perfect.  I don't know if there's perfection, but I do feel that practice builds confidence and gives peace of mind.  Why, you may ask?  Let me tell you.      

A few weeks ago, I spoke with a makeup artist (MUA) about our upcoming photo shoot.  The MUA and I have worked together a few times, and she wanted to try a glittery, motion look that required a setup that I've not done often.  We had two weeks until the shoot.  So the weekend after the conversation, I practiced a lighting setup with Mandy.  I was trying to capture motion/multiple shots of an object in camera.  Here's a practice shot.


50 mm lens, f/6.3, 10 sec, ISO 100
I put the camera on a tripod and held a small flashlight above Mandy's head.  During the 10 second shutter, I turned Mandy in three different directions.  I was pleased with the practice result.  


Later that weekend in a studio, I wanted to practice capturing specular highlights.  I knew that I needed something metallic, and I also knew that I wanted a background that would absorb, and not reflect, light.  I bought some glitter glue and applied it onto an unwanted object.  While using another slow shutter, I waved the glitter object in front of a bare bulb Profoto flash head.  The background was heavy, black velvet.  After a few shutter speed and ISO adjustments, I came up with this shot.


100 mm lens, f/11, 0.3 sec, ISO 100
After having tested various setups, I had a good idea of what my lighting, camera settings, and background needed to be.  I was confident going into the shoot because I had practiced beforehand.  That gave me peace of mind and a better ability to concentrate on getting a good shot from the model and not worrying about lights, camera settings, etc.  And the MUA was pleased with this final image.  


100 mm lens, f/6.3, 0.3 sec, ISO 320
So how do you prepare for shoots?  Do you practice shooting a 'live' person, do you read photography articles on various websites, do you watch how-to videos?  Does it give you more confidence during a shoot?  I'd love to know.


Monday, June 11, 2012

Tears, Then and Now

Here are some unretouched images from my Creative Live student shoot with Lindsay Adler.   I used individual tears from each of these shots to create the final retouched shot with multiple tears.  


Here's the final image.  I will be adding more tears and making more edits to this shot, but I wanted you to see the progression from where the image started until where it is now.

Retouched image.  More tears and edits to come.

By the way, when we were testing our lighting, I took this shot of Lindsay using the same lighting as the tear images.  Lindsay did the retouching.  She was a good model!


Thursday, June 7, 2012

Dollina

By the way, Dollina went to Seattle, too.  Disregard the safety pins in her tummy.  I was gonna put her arms and legs back on at the workshop.  I wanted to show that after the workshop, she found her limbs and I found what was missing from my photography.  


(Though it looks like  I'm doing something crazy like whispering in a doll's ear, I'm actually giving her a little kiss on the head.)

AHA! Creative Live, Baby!

Some of you may know, I attended Lindsay Adler's Creative Live Fashion Flair workshop.  It was AWESOME!  I had such a great time.  People have asked me what it was like.  In the words of Oprah, I can say there were many 'AHA' moments.  Let me explain.

During Lindsay's session with the male model in continuous light (the tic tac toe tubes), she was explaining how to get the nice shallow depth of field where the subject's eyes are in focus, but everything else falls soft.  She was saying to have the subject lean forward.  I understood the words that she was saying, but for some reason, I couldn't picture what it meant to have a subject lean forward. Until she had the model do it.  AHA!  It was so simple.  Lean forward as in bend at the waist so that the head and shoulders are closer to the camera.   


For some reason, before taking her workshop, I thought the way to get that shallow depth of field meant standing on a chair or ladder and having the subject look up at you.  It didn't click what Lindsay meant until she actually had him do it.  I could hear it, but couldn't see it in my mind.  You know how in cartoons, a light bulb will turn bright above somebody's head?  Well, that was me during that session.  Sometimes seeing someone do something on a video or in person is extremely helpful.  And Lindsay's tip was definitely that.  But that wasn't the only AHA! that I had.

While we were in the alley shooting the 1950s theme with the car and couple, I got a chance to shoot.  For the past few months, I've been trying to improve my composition techniques, so I've been shooting a lot of leading lines.  So I figured with that beautiful classic car, I'd work on the leading lines.  I also like hands, and I knew that I wanted the young 'bride' to gently touch her new 'hubby's' face.  I wanted to lead you to that moment between the couple.  

As I shot the scene, Lindsay gave me feedback on how to improve the shot.  As we looked at the back of the camera, the leading line was not having the impact that it should.  I got half a headlight or a whole headlight in the first few shots.  Then Lindsay told me that I needed to shoot 'into the line', not start at the headlights.  That way the line could lead you to the couple.  AHA!  What a difference that made!  It looked so much better when the lines from the hood and side of the car led to the couple. 

There were so many AHA! moments watching Lindsay.  I was struck by how quickly she processed ways to improve our shots when we did our student shoots.  Many times I was wondering how she could instantly 'see' that a chair, hip, or leg looked too prominent in a scene.  I would have gotten back to Virginia and downloaded the images before realizing that something looked too big in an image.  (Too late.  I'm back in VA and the 'bride's' hip in the image below looks a little prominent.)  So the AHA! moment for that was 'pay attention to the setup and what your eye keeps going to in a shot'.


So those are some of the great learning moments from her workshop.  As you all  saw, Lindsay is a great teacher who knows her stuff.  After watching her workshop, I hope many of you are saying AHA! too...